Installing interlocking floor tiles can be a rewarding project. It allows you to transform your space while saving money. Learning how to install interlocking floor tiles by yourself gives you a sense of accomplishment. You gain valuable skills that can be applied to future home improvement tasks.
DIY projects can be challenging. Mistakes are common, and not every step will go as planned. However, these experiences often lead to great learning opportunities. A bit of patience and practice can turn any novice into a skilled DIYer. The satisfaction of seeing your finished floor is worth the effort.
Additionally, mastering this skill can enhance your home’s value. It’s an investment in both your property and your abilities. With the right guidance, creating a stunning floor becomes achievable. Embrace the journey of learning how to install interlocking floor tiles by yourself, and you might be surprised at what you can accomplish.
Installing interlocking floor tiles yourself offers numerous benefits. Firstly, it can significantly reduce costs. Hiring a professional may seem convenient, but the fees add up quickly. By doing it yourself, you can save money and invest it into better quality tiles. This added investment can enhance the overall aesthetic of your space.
Another advantage is gaining valuable skills. Learning to install tiles is a hands-on experience. You may encounter challenges, like uneven surfaces and tricky corners. These obstacles provide a chance to develop problem-solving skills. Reflecting on mistakes can help you improve your technique in future projects.
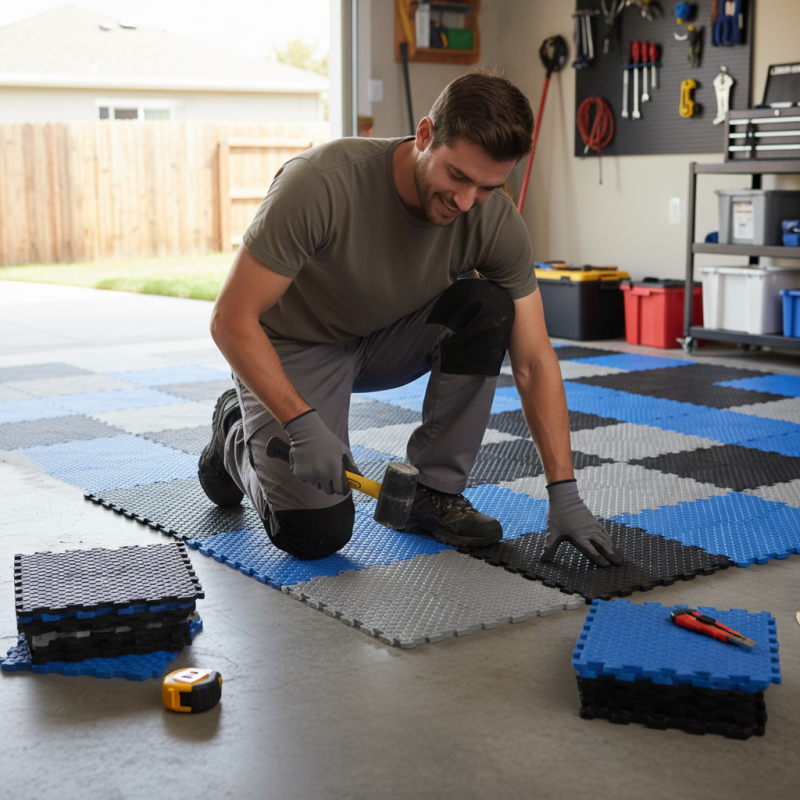
Tips for installation include measuring your space carefully. A precise measurement ensures your tiles fit correctly. Take your time with the layout before sticking anything down. Also, keep a level handy. An even floor not only looks better, but it also prevents future issues. Lastly, don’t hesitate to ask for help. A second pair of hands can make the process smoother, especially when handling larger tiles.
Installing interlocking floor tiles can be a rewarding DIY project. To get started, you need to gather essential tools and materials. A utility knife, straight edge, and measuring tape are fundamental. You will also need a level to ensure a flat surface.
According to industry reports, proper preparation is key. A clean, dry subfloor is crucial for successful tile installation. Dust and debris can compromise the integrity of your tiles. Additionally, investing in quality tiles ensures durability. A report from the Tile Council of North America highlights that poorly installed tiles can lead to significant repair costs over time. This emphasizes the importance of using the right tools.
**Tip:** Before installation, measure the space carefully. This helps avoid mistakes. Double-check your calculations to minimize waste. Consider practicing on a small area first. Understanding the process can save time and effort later.
When preparing your space for interlocking floor tile installation, a few essential steps can ensure a smooth process. Begin by assessing the area. Remove any old flooring, as it may interfere with the new tiles. According to flooring industry reports, nearly 30% of DIY failures relate to inadequate preparation. This emphasizes the importance of starting with a clean slate.
Next, level the subfloor. An uneven surface can lead to visible imperfections and reduced durability. Use a leveling compound to fill in any low spots. Studies show that flooring installed on a properly leveled surface can last 25% longer than those installed without preparation.
Don’t forget to measure carefully. Accurate measurements lead to fewer wasted materials. Plan your layout and consider the visual flow of the tiles. A well-thought-out design can enhance the room's aesthetics. Remember, every detail counts. While you might feel ready to dive in, reflect on each stage of preparation. This step ensures a successful installation, avoiding costly mistakes down the road.
Installing interlocking floor tiles can be a rewarding DIY project. With some basic tools and techniques, you can transform your space. Properly laying these tiles ensures a durable and attractive floor.
Start by preparing your subfloor. It should be clean, dry, and level. Any bumps or debris can affect the tiles' alignment. Use a level to check the surface. If your floor is uneven, consider using a leveling compound. This step is crucial for achieving a smooth finish.
One tip is to plan your layout beforehand. Measure the room and mark lines where tiles will go. This visual guide helps maintain straight edges. As you begin laying tiles, start from the center. This technique helps avoid awkward cuts at the edges. Don’t rush through the process. Take time to adjust the tiles for a snug fit.
Another essential point is to use spacers if necessary. They help keep consistent gaps between tiles, aiding in expansion. If you encounter a broken tile, replace it carefully. Small mistakes can happen. Reflect on these moments and learn to improve your technique for future projects.
Installing interlocking floor tiles can be a rewarding project. However, maintaining these tiles is crucial for their longevity. Regular cleaning is essential. Using a gentle, pH-balanced cleaner can prevent discoloration. According to industry research, improper cleaning can diminish the tile's lifespan by up to 30%. Make sure to sweep or vacuum weekly to remove dirt.
Humidity control also plays a significant role in tile maintenance. Excess moisture can cause warping or mold growth. Keeping indoor humidity below 50% can help. Using a dehumidifier in damp areas is often necessary. It's worth noting that the Environmental Protection Agency states that mold can grow in just 24 to 48 hours when conditions are right.
Inspecting the tiles regularly is another key practice. Look for signs of wear or damage. Cracks can develop due to heavy items being dropped or extreme temperature changes. Address these issues promptly to avoid more significant repairs later. Small repairs can often be done independently. However, if problems persist, consulting a professional may be the best option. Your efforts will pay off, leading to a more durable and attractive flooring solution.
The chart above illustrates the benefits of learning how to install interlocking floor tiles yourself. The ratings reflect the perceived advantages, including cost savings, skill development, ability to customize, control over maintenance, and overall project satisfaction. By taking on this DIY task, homeowners can enhance their skills and enjoy the long-term benefits of their investment.
: Essential tools include a utility knife, straight edge, measuring tape, and a level.
A clean, dry subfloor ensures tiles adhere properly. Dust can compromise the installation.
Measure the space carefully and double-check calculations to minimize waste.
Use a leveling compound to fill in low spots. An even surface enhances durability.
Clean tiles weekly using a gentle, pH-balanced cleaner to maintain their appearance.
Keep indoor humidity below 50% to prevent warping and mold growth.
Inspect tiles regularly and address cracks or wear promptly to avoid larger repairs.
No, harsh cleaners can discolor tiles and reduce their lifespan significantly.
Properly installed tiles on a leveled surface can last 25% longer than poorly prepared ones.
Skipping preparation can lead to installation failures and costly repairs later on.
Learning how to install interlocking floor tiles by yourself offers numerous benefits, including cost savings and the satisfaction of completing a home improvement project. With the right tools and materials, anyone can tackle this DIY task. Essential items include a measuring tape, utility knife, and a level. Proper preparation of your space is crucial; it involves ensuring the surface is clean and dry before beginning installation.
Once your area is ready, follow a step-by-step guide to lay your tiles effectively. Techniques for positioning and aligning the tiles will help achieve a professional finish, while regular maintenance tips will ensure their longevity. Overall, mastering how to install interlocking floor tiles by yourself not only enhances your living space but also empowers you with valuable skills.
Pelvic Floor